If you are a lover of the great outdoors, you probably like to spend time out in the wilderness hiking and camping.
If you ever spend the night in the woods, whether intentionally or accidentally, you need to know how to build, maintain, and control a fire.
A fire can be used to keep warm, cook food, boil water (to purify it), and even signal rescue parties. It can keep you alive! However, a fire can be difficult to make and control.
There are many, many ways to start a fire, but let’s go over the basics first.
Getting started
First you need a fire starter. This can be a piece of paper, cloth, grass, shredded bark, or wood shavings. I have started a fire with a single piece of wood. First, I used an ax to split the wood into pieces of varying sizes. I then took one of the smallest pieces and shaved off small curls with my pocket knife. These pieces were small enough to light with a single match.
The point is, you start with something small. If you were to have a propane torch handy, you can start with much larger pieces of wood because you’d have a sustainable flame. But that isn’t really the point of this tutorial, so we’ll stick with things like matches.
With bark, all you have to do is find a dead log with bark still on it and pry some off with a knife. If the wood is freshly fallen and green, the bark will be a bit on the spongy side. If the wood has been on the ground for a while, the inside of the bark will be drier and papery. The latter is better for making a fire.
You should be able to shave off some of this material and crumple it up by hand. The more shredded it is, the easier it will catch.
Second, you need small kindling. Kindling is small twigs and thin branches. It can also be pieces cut from bigger strips of wood. These pieces should not be much thicker than a pencil, and smaller is better.
Third is large kindling. These are sticks and small branches that are one to two inches in diameter. Both large and small kindling can be used to create wood shavings for the starter material I mentioned before.
Fourth and final, you’ll need some logs. You should gather branches and logs that vary in thickness — between the diameter of your wrist and your thigh (depending on how thick your thigh is!). Three inches to ten inches is a good rule. It also depends on how big you want your fire.
Now, as I said, there are different methods of getting the initial flame. You can use a lighter, a match, a flint and steel, or a magnifying glass. I have even seen people use more exotic means, such as chocolate and a soda can, steel wool and a 9v battery, and even ice. Yes, I said ice!
However, it doesn’t matter what method you use to start the fire if you don’t know how to build the fire in the first place.
Building a fire
First, find a place that is dry and out of the wind. If needed, create a shelter of some kind to protect the fire. Just make sure that the shelter does not catch fire or smother it.
Place your starter materials, and then place a few rocks or bigger logs on either side of the pile. Make sure that the material that you use is not too tightly balled up. It needs to get some air into the center.
Place some of your smaller kindling over the starter pile in a loose tepee shape. It helps to have some of the pieces angled up a bit, because heat rises, so fire travels up faster than down.
Next, lay one of your longer kindling pieces over the starter pile with the ends resting on the bigger logs. Lean several pieces of the large kindling against these pieces so that they are right above the pile.
Now comes the fun part. Light the starter pile. If possible, light it in multiple places. As the flames grow, blow towards the base of the fire with long, slow breaths. Do not blow hard until the kindling pieces have caught fire. If you do, the starter will burn up too quickly and the kindling will not have a chance to catch.
Being careful not to burn yourself, move some of the small kindling pieces around if they are not above the flames properly. Do not block air from getting to the flames. Fires need oxygen!
As the small kindling begins to catch fire, continue to blow long, even breaths at the base. You can blow a bit harder, but it is actually better to blow long and slow because in between breaths, the fire will cool slightly — so it’s kind of like taking one step forward and two steps back. Long, slow breaths provide continuous oxygen, which allows the heat to build steadily. The fire will spread faster this way, and you won’t tire yourself out as quickly.
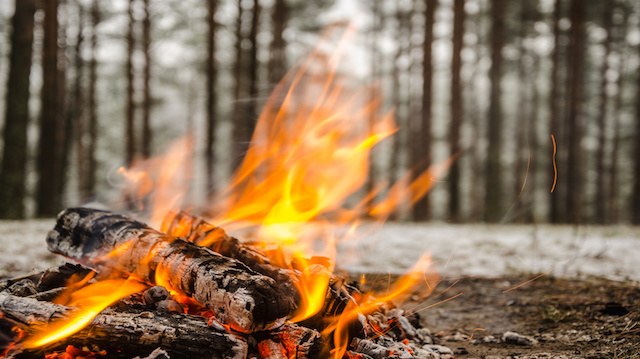
Once the large kindling has caught sufficiently, you can start putting on the bigger branches. You should still start small and build up to the really big stuff after a good base of glowing red coals has been established.
The coals are really good for cooking, and if you want more heat, just add another log.
Controlling and putting out a fire
 Be careful not to let the fire get out of control. Letting a fire burn overnight is risky because it may start a forest fire. If you do need to keep the fire going overnight, it will probably go out while you sleep, but there should still be enough coals in the morning to start a new fire without any matches or lighters. Just place the starter material over the coals and blow on them until you get a flame. Then just repeat the whole process.
When putting out the fire, spread the coals out so you can be sure every coal is accounted for, and that there aren’t any buried underneath the ashes. I have seen bonfires get rained on and appear to be out, only to spring back to life days later. Whether you dump water on it or just let it burn out, make sure every coal is out, and then throw some dirt on the remnants to help smother them further.
Well, now you know how to build a strong fire. Have fun, but remember to be careful!
And next time you go camping and build a fire, roast a couple of s’mores for me.
—Kyle Kramer
Kyle is an outdoor enthusiast with a passion for nature and sustainability. When he is not writing, you will find him in his workshop crafting with local wood, hiking in the Arizona mountains, fly fishing, horseback riding or putting together a healthy meal in the kitchen.
Source:
http://www.theclymb.com/stories/tips/10-tips-for-wilderness-survival